BigBoxDB is my way of showcasing what old PC software packaging used to be like and how exciting it was back then, before it slowly devolved to smaller boxes, DVD boxes, and then almost nothing now as of 2025. All this stuff took a LOT of shelf space on store shelves, and I totally get why it died when digital distribution became a thing, though I wanted to help preserve how BIG some of this stuff was, and some of the crazy ideas/gatefold/shapes some of these had for about 20 years or so.
How it started
This started as a way to organize my PC game collection in HTML tables/camera photos. I wanted to highlight not only what I had in my collection, but also showcase what the box/contents looked like. Mostly because the evidence that a lot of these games even exist are… spotty at best. Espiecially around the contents/manuals/etc. I would put the box and contents on the floor, try to arrange it so everything is visible, take a picture, move on to the next box.
This worked though the result was… okay. It felt very tedious for the end result (ha!) and even though my online list was 100s of games long, it didn’t FEEL like a collection/spectacle that I was trying to go for. Like these games take up a lot of shelf space and are full of different colors/logos/etc, it should feel like something more! I kind of stopped recording my games at that point out of boredom.
Somehow I came upon BigBoxCollection who had the same idea as me, only he rendered out his collection per box in 3D using three.js libraries with javascript. This tipped off SO many lightbulbs in my head, mostly because not only had I already worked with three.js before for other projects, but scanning each side and essentially making cubes with materials (most of the time…) was pretty easy! I ended up reaching out to him fanboying over the idea and asking him about his tech stack, then starting on my own version of the same idea.
Lets talk about shelves
Now I loved what Ben’s work with BigBoxCollection was about how he even made his own normal/bump/specular maps for each box ‘manually’ that had them. This is insanely cool and a lot of work, but I felt it was far too manual if I wanted to do that myself. I looked into photogrammetry and tried to think of ways to automate the process a bit more but couldn’t come up with much for shapes that are ‘mostly’ flat (other than scanners that have reflectivity measurements but lets ignore how expensive those are). So I ended up discarding wanting to do that for now in favor of a different kind of spectacle.
I started prototyping out in raw three.js a way to render a shelf along with a box that was 6 sides with different materials on each side, while also taking custom dimensions per box. This ended up being easier than I thought, since 3d space doesn’t really have a unit of measurement, so I just used literal inches as my base line. I scanned Terminal Velocity and got to work. After about a weekend I had a pretty modular prototype where I could feed in different JSON files and it would render each box on a shelf.
Lets move backwards for a minute and talk about scanning
Flatbed scanners are a delicate yet simple thing. Different image sensors, different DPIs, different sizes/lights, etc. It can get real dumb real fast, but also there are EASY middlegrounds for scanning already printed material like I am. Like for example, we can ASSUME that most boxes are printed at 300DPI and we can ASSUME that most boxes are within 8.5x11 (I say most because there are a lot that aren’t, we’ll get to that later). I started with an Espon V39 which is perfectly serviceable for what it is for under $100 CAD. Though being so cheap means it has a CIS sensor.
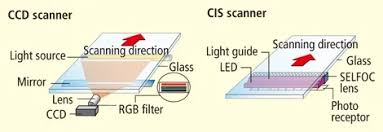
The idea behind CIS are little tiny photo receptors/lens following the light as it scans. This is totally fine for documents/already printed photos because everything is flat and pushed down, but when the subject has any bumps or its too big for the scanner and hangs off a bit, things can get out of focus and dirty kind of quickly. I ended up looking for a CCD sensor, which is more like a digital camera and lens and the light/mirror move independantly, allowing for more consistency throughout while having better color reproduction on top of that. I ended up chosing an Espon Perfection V600 and was about to buy one new, but thankfully I got one for less than half the price from a photographer who used it to scan slides/photos professionally (thanks John!). That same V600 has been my workhorse for the project and have zero issues with it.
Ironically the Espon software is pretty garbage, especially on Linux where you feel lucky to just have the SANE drivers at all. I ended up finding VueScan pretty quickly and love/would recommend it to anyone who scans anything ever. It is NOT free or open source, but gets consistent results every time, highly customizable, and is used by the Canadian Government for preservation reasons!
Since all of this is print and probably at a not crazy DPI, we can actually not go all out at 4800 DPI, and probably get away with 1200 DPI for images and 300 for any text/manuals. This is mostly to keep our file sizes down, for example:
Terminal Velocity Front:
- 1200DPI: 226mb
- 2400DPI: 801mb
- 4800DPI: 801mb?
I think this is because it can’t extract more data from the image, so even doubling the dot count doesn’t actually provide any other data to convert, and just takes longer. It’s only a 1/4 of the size so think this totally worth it/manageable. So I stuck with 800/1200DPI at best.
I end up converting this down to webp files anyway so it’s even smaller and nowhere close to print quality on the site (though I keep all my source files on a NAS).
Okay back to the shelves
I couldn’t just load JSON files as my main way to do load the materials/boxes, I needed to do the whole thing with a backend/database/etc. I decided to use this as a way to push into learning a whole tech stack at once, settling with NextJS, MongoDB (which is probably overkill now tbh), and react-three-fiber to help making the boxes more ‘react-able’.
Okay great! I have a box loading from a DB. Now all I have to do is scan every box I own, this won’t get overwhelming in the slightest right? …Right?
In order to make this a bit more pleasing and make the effort more ‘worth it’, I decided to make shelves for these cubes to sit on, similar to my IRL shelves. This really wasn’t that hard to automate. I would just make a shelf of 100 units wide (I decided to use inches as units), put a bunch of boxes on it lined up to the z and y to the bottom of the box starting a little offset from the starting x value of the shelf (so it doesn’t directly hug the very left edge). For every box I wouls just offset the x value by the last box. When the ’next box’ would be more than 100 units, I would just make a new shelf and move it below. Repeat until all boxes are on any number of shelves. Easy!
It wasn’t so easy
Performance became an issue really quickly. At this point I was making 6 webp files for each box, and it was loading all 6 webp files for each side of the box. Initially I tried to be a bit smart about this and not load the bottom or left side of the box (or back if front facing), since you would never see those anyways unless you picked it up. But even that wasn’t enough, mostly because of how much ThreeJS would have to load.
Think about it, 6 textures per box (more if it had gatefolds) * n boxes. After 100 boxes thats 600+ texture loads easily, let alone the renderer doing all of this with no repeated textures at all for anything.
After blowing up on Twitter someone random told me I should just do it all again in pure CSS, so I did…
The CSS version
This wasn’t really that hard to accomplish all things considered, and solved a few different problems. No more canvas means there was no performance bottleneck, and automating/using the CSS perspective and lots, and lots, and lots, and lots of 3d transforms and I was able to make a pretty good remake using JUST divs/CSS. Complete with the same hover events and info states. You can still see a version of this (assuming it still works) here.
Unfortunately, with most CSS things, there was a lot of cross-browser jank that I just had no control over. Mostly with chrome and seemingly having a limit to what events could fire and how often. As I kept scaling up with boxes, events would just randomly not fire with no error logs in Chrome, with Firefox working perfectly well. I was pretty reluctant to go back to ThreeJS unless I had a better option for loading/performance.
GPU Texture Packing
I researched a bunch and realized I could pack all the boxes into a single glb file and ThreeJS would just happily load it WITH THE TEXTURES BAKED IN. With a python script I was able to go through all my boxes again and convert them to a KTX2 texture format with some compression settings:
UPSIZE_RATIO = 80
UPSIZE_RATIO_LOW = 60
KTX2_COMPRESSION = 'etc1s'
KTX2_QUALITY = 255
KTX2_QUALITY_LOW = 180
OUTPUT_FORMAT = 'glb'
I would generate 2 different glb files, each with different size ratios from the webp files, one for the shelf, and the other for when you ‘pick it up’. This got the size/load time per box down DRAMTICALLY. For a simple box I’m talking like 170kb for the whole box, and thats on the high end. Sometimes low as 60kb! And that’s with ALL the textures baked in! I was ecstatic!
So that’s where things are at right now
I’m really proud of the journey and pitfalls of everything. There’s still more to scan and explore how to do better. This has all been a side project of mine of scanning/optimizing code and exploring new ways of doing things and I couldn’t be happier with where it’s ended up so far.
Please feel free to visit BigBoxDB and come hang out in our discord!